This Learn AWS Series is based from a post on Reddit by u/SpectralCoding (reddit.com) called So, you want to learn AWS? AKA, “How do I learn to be a Cloud Engineer?” (reddit.com)
Welcome to Part 2 of Learn AWS. In this post, we will get into it and actually make something, launching a linux virtual machine and then connecting to our virtual machine via SSH.
Doing all this will prove that you can make a virtual machine, configure the firewall to allow us to remote into it and finally access the machine so that we can then begin setting it up a website.
Step 1. Lets just dive right into it and make ourselves a Virtual Server. Lets head over to the EC2 Mangement Console (console.aws.amazon.com). Make sure you are in the same geographical location as you choose for the billing alerts. (aka your nearest location) Click on ‘Launch Instance’. Then choose ‘Amazon Linux 2 AMI’. This flavour of linux is based on CentOS but also heavily customized by Amazon to be super efficient of AWS hardware and resources.

Now we choose the hardware. For our usage we will only ever use the t2.micro. As its the only free choose. The optomized Amazon Linux runs fairly well on this low specced hardware and will be more then capable of doing what we need it to do.

Hit ‘Review and Launch’ as we will not be running anything custom just yet. Then click ‘Launch’.
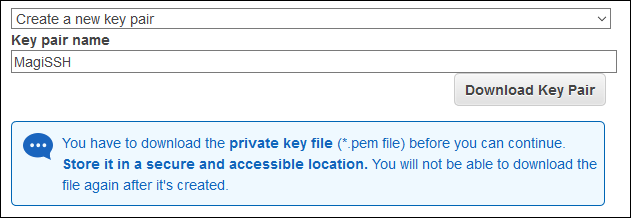
This is going to prompt for a SSH Key Pair. Since you dont have one, your going to need one.
With linux machines, you don’t remote into them with a fancy graphical desktop, you connect to a shell session that is like a command prompt that allows you to run commands from a text interface. With most Linux distributions, the normal method of this is via SSH (Secure SHell).
SSH normally just requires a username and password but to add a layer of security it can require an SSL certificate. This is vital as AWS Linux instances (and Azure) use SSL Certficiates to not only authenticate the login but encrypt SSH communication. If you dont have the correct certificate, you will not be able to SSH into the VM. This means you need to pay attention to this part.
Select ‘Create a new key pair’. Give your key pair a name. And finally, download your your key pair and save it to a safe place. remember this file for the future you will need it very soon.
Click on ‘Launch Instance’ once you have saved your SSH Key Pair file to safe place. Click on ‘View Instances’ to go to the Instances screen. This will show all running virtual machines. Once your machine is in the running state, we can now connect to it.
Step 2. Now its time to configure the firewall for the Linux Server to allow (or block) traffic to it. A firewall is a list of rules that approve or deny networking traffic to your webserver. This allows us to do some pretty useful things such as locking down access to the server to certain IPs and only allowing certain protocols such as website traffic, database traffic or remote access traffic.
By default your new virtual server will accept incoming connections on Port 22, which is the port used by SSH. However it wont accept HTTP or HTTPS connections by default. This needs to change. Click on Instances (console.aws.amazon.com) on the left hand pane to go to the Instances screen.
This should show all your current virtual machines and allow you to do many things such as start and stop virtual machines, edit hardware configs or template machines.
Under the Security Groups heading, click on the ‘Launch-Wizard*’ security group to edit it. This will take you to the Security Groups page (Also available on the left hand side.) Click on ‘Actions’ and then click on ‘Edit inbound rules’ and then click on ‘Edit inbound rules’.
Click on ‘Add Rule’ and in the Type Field. Choose HTTP. Do it again and choose HTTPS. You could setup custom firewall rules here if you need, but AWS has a bunch of the basic stuff already setup, so that’s what we will use.
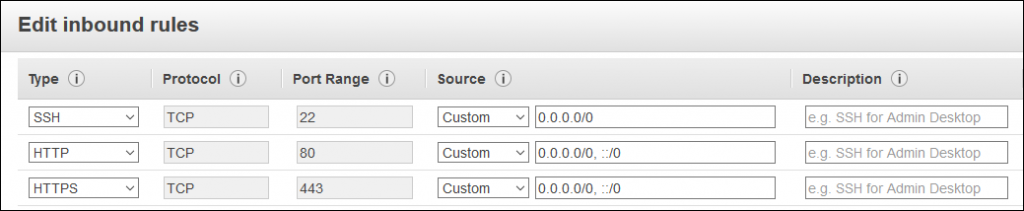
If we were security concious, we could look at locking down SSH access to our specific Internet IP to reduce attack vectors. For now. We will leave it as is.
Step 3. Connecting to the Virtual Machine.
Ok. We are ready. Our virtual machine is configured and running. Time to actually connect to it so we can start the task of making the machine do something useful.
On windows, to make an SSH connection, we typically use a 3rd party program called PuTTY. Recently you can now use Powershell. But I’ve found PuTTY to be easier. PuTTY is a very powerful tool for connecting to a variety of machines, but for our purposes, its also very easy to setup and configure.
You can download and install PuTTY from the Chiark website (chiark.greenend.org.uk). Its fairly easy to install. If you run into trouble, you should be able to find help easily enough. Please note, if you choose to download the applications as stand alone, you will also need PuTTYgen.
Before we can use PuTTY we need to convert our SSH Key Pair we created earlier into a format that PuTTY can use.
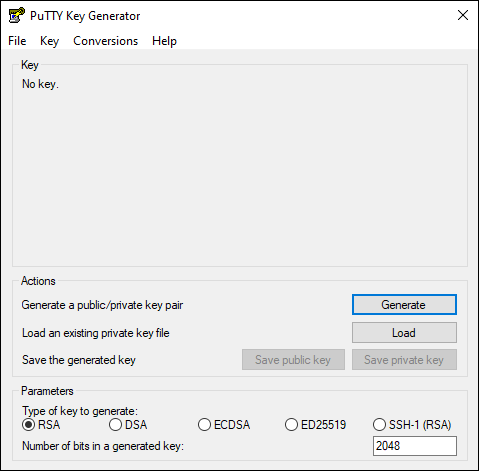
Launch PuTTYgen and click the ‘Load’ button. Near to the Open and Cancel buttons, use the file type selector box to change from ‘PuTTY Private Key Files (*.ppk)’ to ‘All Files (*.*). Browse to where your SSH Key Pair is saved and open it up.
Once loaded into PuTTYgen, you can simply save the private key and use it as is or we can add an additional layer of security by adding a password.
We are going to add the extra security here. Fill in the ‘Key passphrase’ and ‘Confirm passphrase’ boxes with a secure password. Then click on ‘Save private key’. Save the private key to a safe location. We are now done with PuTTYgen.
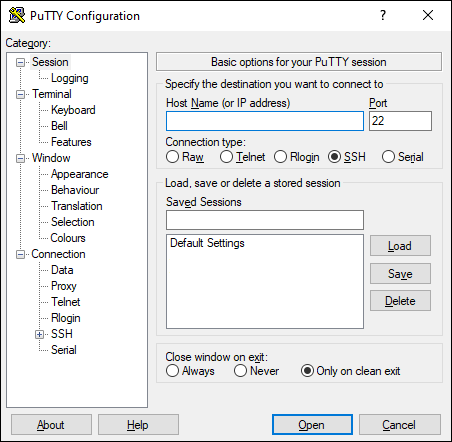
Open PuTTY and you will be presented with the above. Looks like we need some basic information. We know we are using SSH and Port 22. Both of which are the default selection. The host name can be found in your EC2 Mangement Console (console.aws.amazon.com). Look for Public DNS or Public IPv4 (or Public IPv6 if your ISP and home/work network supports it)
Now we just need to attach our SSH Key Pair file. In the left hand Category tree view, expand ‘SSH’ and select the ‘Auth’ option. Click the ‘Browse’ button and select your previously created PPK (Private Key) file from PuTTYgen.
Return to the ‘Session’ tree view option. In the ‘Saved Sessions’ box. Type a meaningful name. We are going to use AWS Webserver. Click the ‘Save’ button.
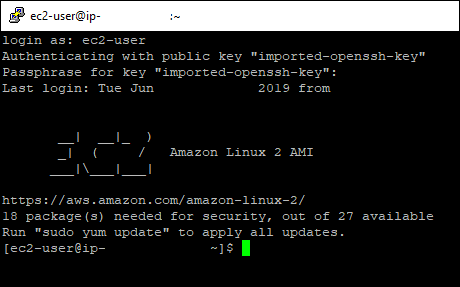
From now on when we launch PuTTY, we can just double click on the Saved Session and connect straight to our Virtual Machine. Double Click on the AWS Webserver Saved Session and connect to it now.
The first time you do this, you will need to accept the SSH SSL Certificate warning. Log into the machine using the username ‘ec2-user’. If you added a password when creating the Private Key. You will need to enter that as well.
And BAM. Your connected. You can now run whatever commands you want against your linux virtual machine.
Stay tuned for Part 2b where we update our machine and then install the web server components to get a basic page going.